![]() Chevrolet Traverse 2013-2017
Chevrolet Traverse 2013-2017
Must be equipped with factory rear view camera
Installation Manual Interface with HDMI Input
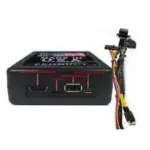
Part #: NAVTOOL6.0-AR2-HDMI
Chevrolet Traverse 2013-2017 Interface with HDMI Input
NOTICE: Navtool recommends having this installation performed by a certified technician.
Logos and trademarks used here in are the properties of their respective owners.
WELCOME
IMPORTANT WARNING
This product includes instructions for installation, which must be carefully followed. The instructions are worded in such a manner to assume that the installer is capable of completing these types of electronic installations. Suppose you are unclear about what you are instructed to do or believe you do not understand the instructions to complete the installation properly and safely. In that case, you should consult a technician who has this knowledge and understanding. Failure to follow these instructions carefully and install the interface as described could cause harm to the vehicle or safety systems on the vehicle. Interference with specific safety systems could cause damage to persons as well.

Open the camera app on your smartphone and point your rear camera at the QR-Code to scan it. Finally, tap the pop up banner to open support website.
Precautions
PLEASE READ BEFORE YOU START THE INSTALLATION
- Please study these instructions carefully before installing NavTool interface.
- Many new vehicles use low-voltage or data-bus systems that can be damaged by test lights and logic probes. Test all circuits with a digital multi-meter before making connections.
- Do not disconnect the battery if the vehicle has an anti-theft-coded radio, unless you have the radio code.
- If installing an external push button switch, check with the customer about where to install the switch.
- To avoid accidental battery drainage turn off the interior lights or remove the dome light fuse.
- Roll down a window to avoid being locked out of the car.
- Use of this product in a manner different to its intended way of operation may result in property damage, personal injury, or death.
- Set Parking brake.
- Remove the negative battery cable.
- Protect fenders before starting.
- Using protective blankets to cover front seats, interior of the vehicle and center console.
- Always install a fuse 6-12 inches away from NavTool interface, 5 amp fuse should be used.
- Always secure NavTool interface with Velcro or double side tape to prevent rattling of the interface.
- When securing NavTool interface make sure that panels can be closed back easily.
- Use electrical tape on all you connections and splices, do not leave any exposed connections.
- Route all wires along factory harnesses, try not to drill or make any unnecessary holes.
- Make sure you are not connecting to any data wires; always check your connections with a multimeter.
- Always use help of a professional installer to prevent any damage to the vehicle or NavTool interface.
What’s In The Box?

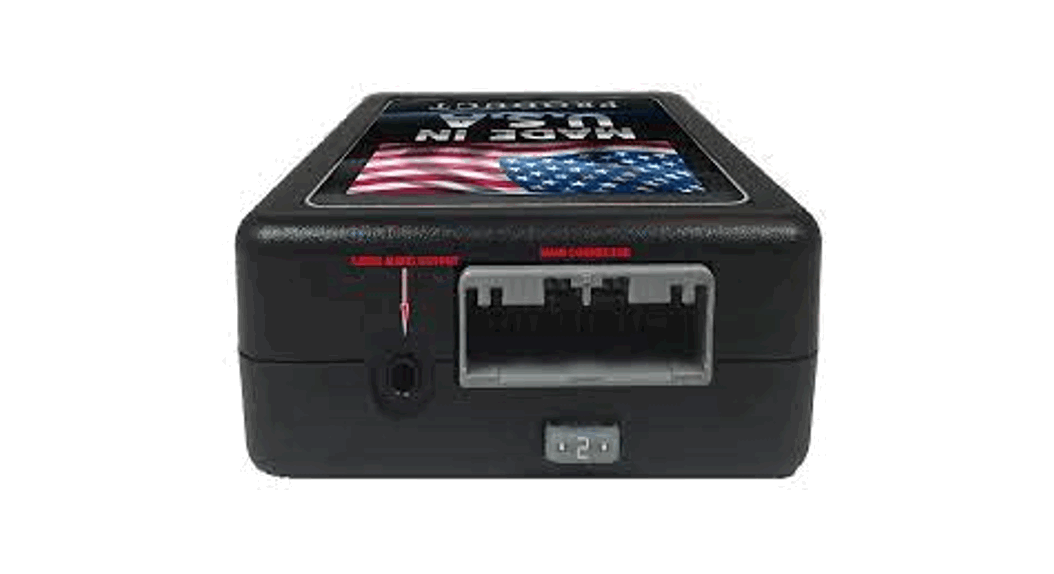
Interface Connectors Description

Main Connector for Universal Interface Harness- This port is dedicated for a connection of a universal wiring harness.
Configuration Port- This USB port is dedicated for the interface configuration only.
Data LED- Normal operation of the interface must have blue LED blinking. If the blue LED is not blinking, the interface is not receiving data from the vehicle. If the blue LED is not blinking, the interface will not operate properly.
Power LED- Normal operation of the interface must have a green LED ON. If the green LED is not ON, the interface is not receiving power. If the green LED is not ON, the interface will not work, and your vehicle radio may also stay OFF.
HDMI LED- Normal operation of the interface must have a green LED ON. If the green LED is not ON, the interface HDMI is not receiving power. If the green LED is not ON, the interface HDMI port will not work.
USB Port- Not Used
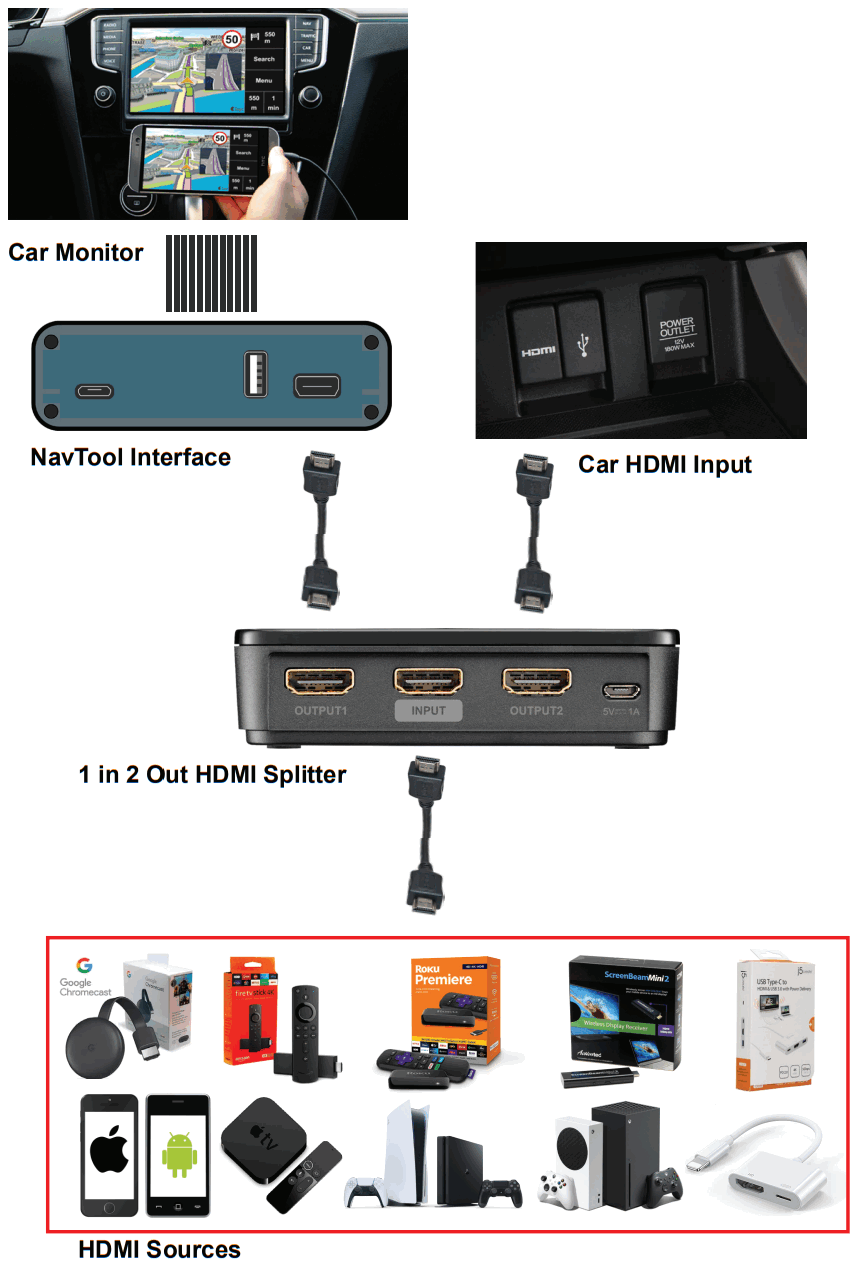
HDMI Port- HDMI port is dedicated for connecting video sources such as iPhone mirroring, Android Mirroring, Apple TV, Roku, FireStick, Chromecast, PlayStation, Xbox, or similar devices.
Universal Harness Description

Rear Camera Input /Video Input 1- This input is dedicated for an aftermarket rearview camera or a video source with an RCA video output. Your vehicle factory camera will continue to work as before without any changes.
Front Camera Input /Video Input 2- This input is dedicated for an aftermarket front view camera or a video source with an RCA video output. Your vehicle factory camera will continue to work as before without any changes.
Left Camera Input / Video Input 3- This input is dedicated for an aftermarket left view camera or a video source with an RCA video output. Your vehicle factory camera will continue to work as before without any changes.
Right Camera Input / Video Input 4- This input is dedicated for an aftermarket right view camera or a video source with an RCA video output. Your vehicle factory camera will continue to work as before without any changes.
Right and Left Audio Output- Audio output is dedicated for connecting audio to your vehicle’s stereo system. See the Quick Connection Guide on page 7 of this manual.
Connector for Vehicle Specific Harness- This connection is dedicated for connecting vehicle specific plug and play wiring harness.
+12V Manual Activation Input- This connection is used for a push button.
+12V Output- 500 mA output can be used to drive a relay. This output provides +12V at all times when the vehicle is running.
Quick Connection Guide

Installation Instructions
STEP 1
NO APPLICATION OR SOFTWARE DOWNLOAD IS REQUIRED TO CONFIGURE THE INTERFACE.
To configure the interface, you must use Windows, Mac, or Google computer.
Windows computers must use the latest version of Google Chrome or Microsoft Edge browser.
Mac computers must use the latest version of the Google Chrome browser.
Google computers must use the latest version of the Google Chrome browser.
TO CONFIGURE THE INTERFACE, GO TO https://CONFIG.NAVTOOL.COM
Connect the interface to the computer using supplied USB Configuration Cable (Part # NT-USB-CNG)
Manual Activation Wire as Reverse Trigger should be set to off. Refer to the video.
To see a video of the configuration process Scan QR-Code or go to https://youtu.be/dFaDfwXLcrY
STEP 2
Remove Vehicle Navigation Radio or Color Screen
List of Required Tools:
- Plastic Panel Removal Tool- Example of a removal tool is shown below. Any similar removal tool will do the job. It does not need to be the same as the picture below.
- 7 mm Socket- Example of a 7 mm socket tool is shown below. Any similar tool will do the job. It does not need to be the same as the picture below.
 Step 1:
- Use a flat-bladed plastic trim tool in order to release the accessory trim plate from the instrument panel assembly.
- Disconnect the electrical connections.

Step 2:
- Hazard Warning Switch Fastener (Qty: 2)
- Disconnect the electrical connector.

Step 3:
- Radio Fasteners (Qty: 2)
- Disconnect the electrical connector.
- Disconnect the antenna cable.

STEP 3
Step 1: Connect supplied plug and play harness (Part # NT-GM1) to the back of the radio.

Step 2: ![]() Reconnect previously removed radio connectors into the back of the radio.
Reconnect previously removed radio connectors into the back of the radio.
STEP 4
Connect supplied universal wiring harness (Part # NT-WHNT6) into plug and play harness (Part # NT-GM1).

![]() (For complete image, see Quick Connection Guide on page 7)
(For complete image, see Quick Connection Guide on page 7)
STEP 5
- Connect audio output on the universal wiring harness (Part # NT-WHNT6) RCA plugs into the vehicle’s AUX input using appropriate cables. See quick connection guide on page 7.
- Connect Push Button wires. Connect red wire to white wire and isolate with electrical tape. Connect black wire to green wire and isolate with eletrical tape.

![]() (For complete image, see Quick Connection Guide on page 7)
(For complete image, see Quick Connection Guide on page 7)
STEP 6
Plug in main interface (Part # NAVTOOL6.0-AR2-HDMI) into the universal wiring harness (Part # NT-WHNT6). See quick connection guide on page 7.

- The product installation is now complete.
- Do not reassemble the vehicle until testing is fully complete. Only after you have tested that everything is working can you reassemble the car.
- If you are adding side or front cameras, install them and plug them into the appropriate camera RCAs.
- If you are installing any HDMI or streaming devices, connect it to the HDMI port of the NavTool.
Testing and Settings
STEP 1
- Start the car, observe NavTool LED lights should be one blinking blue and two steady lit green LED lights.

- At this time, your car radio should boot up into its initial state, and the radio should be working. Please check that the radio operates appropriately. All radio functions are working, including CD, Satellite Radio, AM/FM radio, audio plays from car speakers, and all other radio features.
STEP 2
Turn off camera lines in the settings of your factory navigation. Go into display settings of the factory radio/navigation, then go into Rear Camera Options and then turn off Guiding Lines.

STEP 3
Set Radio to AUX Audio Input:
- SRCE Button: Press the SRCE button to display the audio screen. Press to switch between AM, FM, or XM, if equipped, Disc, or AUX (Auxiliary). Must set a radio to auxiliary/AUX before activating NavTool to hear audio from car speakers. See page 11 step 6 for AUX connection.
- Audio will not play through car speakers if AUX input is not connected or radio is not set to AUX input.

STEP 4
- Test HDMI input if you are connecting any HDMI video source.
- Press and hold supplied push button for 3-5 seconds. The interface will activate on the screen.
- Single press of the push button will cycle through the available video inputs.
- Press the push button until HDMI input is highlighted and you will enter the HDMI mode.

- Video signal from your HDMI source will appear on the screen. If no video source is connected or the connected source is not correctly working, you will see this message.

- Test AV inputs by selecting them in the menu of the interface or if you are installing any aftermarket cameras.
- To test aftermarket front camera, put the car in reverse then into drive. Front camera should display on the screen.
- To test aftermarket left and right cameras, use left and right turn signals. Left and right cameras should display depending on the turn signal activated.
![]() After everything is tested and working, reassemble the vehicle.
After everything is tested and working, reassemble the vehicle.
(The remainder of this page is intentionally left blank)
Vehicle Reassembly Checklist
When performing vehicle reassembly, please make sure to go over the list and checkoff check mark boxes:
- Check to see if all connectors behind the screen, radio, HVAC etc. were reconnected.
- Check that LCD screen shuts off with the key off, and turns back on with the key on.
- Check touchscreen operation.
- Check Heat and AC controls operation.
- Check AM/FM/SAT radio reception.
- Check CD player/changer operation.
- Check GPS signal reception.
- Check cigarette lighter or +12V power source for accessory or constant power.
- Check to see if any other panels that were removed during installation and now being reassembled have all and any electrical connectors reconnected.
- Turn on parking light and check all dashboard lights operation.
- Check all panels for proper fit, make sure no gaps in panels are left behind.
If all steps above are checked off, you will save time, money and have an extremely happy customer.
All above steps eliminate any unnecessary customer comebacks to your shop.
If you require any further assistance please call our tech support line, email or go online WWW.NAVTOOL.COM
1-877-628-8665
techsupport@navtool.com
Connect Rear Screens With AV Input
How to Connect Rear Screens to Car With AV Input

How to Connect Rear Screens to Car With HDMI Input
User Manual For Consumer
Thank you for purchasing NavTool. If you have any questions, please call toll-free at 877-628-8665.
The color/navigation screen will display a factory image when you first start your vehicle.
- Set the radio to AUX input to hear the HDMI audio. See page C2 for details.

- Press and hold supplied push button for 3-5 seconds. The interface will activate on the screen.
- Single press of the push button will cycle through the available video inputs.
- Press the push button until HDMI input is highlighted and you will enter the HDMI mode.

- Video signal from your HDMI source will appear on the screen. If no video source is connected or the connected source is not correctly working, you will see this message.

- To turn off HDMI input, press and hold the supplied push button for 3-5 seconds.
![]() After everything is tested and working, reassemble the vehicle.
After everything is tested and working, reassemble the vehicle.
Setting Radio to Auxiliary
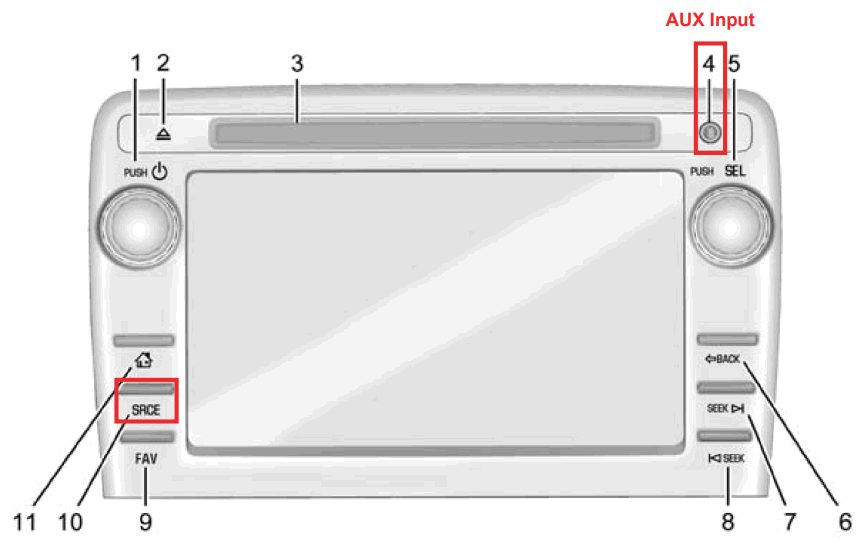
Set Radio to AUX Audio Input:
- SRCE Button: Press the SRCE button to display the audio screen. Press to switch between AM, FM, or XM, if equipped, Disc, or AUX (Auxiliary). Must set a radio to auxiliary/AUX before activating NavTool to hear audio from car speakers. See page 11 step 6 for AUX connection.
- Audio will not play through car speakers if AUX input is not connected or radio is not set to AUX input.
![]() Chevrolet Traverse 2013-2017
Chevrolet Traverse 2013-2017
Documents / Resources
 |
NAVTOOL Chevrolet Traverse 2013-2017 Interface with HDMI Input [pdf] Instruction Manual Chevrolet Traverse 2013-2017, Interface with HDMI Input, Chevrolet Traverse 2013-2017 Interface, Chevrolet Traverse 2013-2017 Interface with HDMI Input, NAVTOOL6.0-AR2-HDMI |