
![]()
![]()
 Read Me
Safety Warning & Caution
Throughout this User Manual you will see important messages regarding your safety or the protection of your vehicle. These messages are designated by the words WARNING, CAUTION, or NOTICE.
![]() WARNING indicates a hazardous situation which, if not avoided, will result in death or serious injury.
WARNING indicates a hazardous situation which, if not avoided, will result in death or serious injury.
![]() CAUTION indicates a hazardous situation which, if not avoided, could result in minor or moderate injury.
CAUTION indicates a hazardous situation which, if not avoided, could result in minor or moderate injury.
NOTICE
A NOTICE indicates a condition that could cause damage to the product or your vehicle.
The product you have purchased is a high-performance product. As such, it does present some risks of which you should be fully aware. Do not use this product until you have carefully read the following safety information and the Owner Agreement.
NOTE: After the display has been installed, the following warning message will appear when powered on. Swipe the screen upward to read the full disclamer.
![]() WARNING: Prior to use, read the User Manual. Misuse of the device could result in traffic accidents, death or serious injury, and/or damage to your vehicle. POWERTEQ IS NOT RESPONSIBLE FOR AND SHALL HAVE NO LIABILITY TO YOU FOR ANY CLAIMS ARISING OUT OF OR RELATING TO ANY MISAPPLICATION OF THE CTS3, CUSTOM TUNES, IMPROPER USE OF CALIBRATIONS, MALFUNCTION OR LACK OF LEGAL COMPLIANCE FOR CUSTOM PROGRAMS CREATED BY THIRD PARTIES. DO YOU AGREE?
WARNING: Prior to use, read the User Manual. Misuse of the device could result in traffic accidents, death or serious injury, and/or damage to your vehicle. POWERTEQ IS NOT RESPONSIBLE FOR AND SHALL HAVE NO LIABILITY TO YOU FOR ANY CLAIMS ARISING OUT OF OR RELATING TO ANY MISAPPLICATION OF THE CTS3, CUSTOM TUNES, IMPROPER USE OF CALIBRATIONS, MALFUNCTION OR LACK OF LEGAL COMPLIANCE FOR CUSTOM PROGRAMS CREATED BY THIRD PARTIES. DO YOU AGREE?
If you agree with the disclamer, select Yes to continue.
Safety Guidelines
![]() WARNING
WARNING
Before using device, read and understand the user manual, including these additional safety instructions. Failure to do so could result in DEATH or SERIOUS INJURY.
- Do not exceed legal speed limits on public roadways. Violating traffic laws is dangerous and could result in injury or vehicle damage or both.
- Use any enhanced speed capabilities of this product only in closed circuit, legally sanctioned racing environments expressly for this purpose. Violating traffic laws is dangerous and could result in injury or vehicle damage or both.
- Do not operate the device while driving. Distracted driving could result in traffic accidents, death or serious injury, and/or damage to your vehicle.
- Always perform all adjustments or changes while stopped. Changing a setting while driving can interfere with your attention to roadway conditions and could result in injury or vehicle damage or both.
- Do not stack products. “Stacking” performance-enhancing devices or other improper installation can cause power train failure on the road. Other products may have features incompatible with your device. Follow all installation and operating instructions.
- Some modifications may affect other parts of your vehicle. For example, if you remove/adjust the speed limiter in your vehicle, be sure your tires and other components are rated for the increased speeds they will have to withstand. Not doing so can lead to loss of vehicle control. Modify the speed limiter only for use in closed circuit, legally sanctioned racing environments, not for use on public roadways.
NOTE: The stickers included in some products apply to products that have recieved CARB exemption for emissions compliance.
This product may meet the emissions compliance requirements of the California Air Resources Board and Federal Environment Protection Agency. If so, it is legal for sale and use on pollution-controlled vehicles operated on public streets and highways. The device must be installed and operated according to the instruction provided in this user manual. Included with these compliant products is a sticker for you to keep in your vehicle. You can either adhere it somewhere on the vehicle (e.g., the inside end of driver’s door) or simply store it in your glove box.
The purpose of these stickers is to inform anyone who may have questions regarding the use of this product and how it affects emissions. For example, it would be something to show an emissions technician if questioned when taking your vehicle in for an emissions check to let him/her know the product is CARB emissions compliant.
FCC Compliance
![]() Contains FCC ID: TFB-1003
Contains FCC ID: TFB-1003
Contains IC: 5969A-1003
Edge Products CTS3 Programmer
This device complies with Part 15 of the FCC Rules. Operation is subject to the following two conditions: (1) This device may not cause harmful interference, and (2) this device must accept any interference received, including interference that may cause undesired operation.
Warning: Changes or modifications to this device not expressly approved by Edge Products, LLC could void the user’s authority to operate the equipment
Note: This equipment has been tested and found to comply with the limits for a Class B digital device, pursuant to Part 15 of FCC Rules.
These limits are designed to provide reasonable protection against harmful interference in a residential installation.This equipment generates, uses, and can radiate radio frequency energy and, if not installed and used in accordance with the instructions, may cause harmful interference to radio communications. However, there is no guarantee that interference will not occur in a particular installation. If this equipment does cause harmful interference to radio or television reception, which can be determined by turning the equipment off and on, the user is encouraged to try to correct the interference by one or more of the following measures:
RF Exposure
This equipment complies with radiation exposure limits set forth for an uncontrolled environment. This equipment is in direct contact with the body of the user under normal operating conditions. This transmitter must not be co-located or operating in conjunction with any other antenna or transmitter.
Industry Canada
This device complies with Industry Canada licence-exempt RSS standard(s). Operation is subject to the following conditions: (1) this device may not cause interference, and (2) this device must accept any interference, including interference that may cause undesired operation of the device.
Quick Start
In-Cab Display
Accessories
 Cable Installation
- Locate the OBDII port. The connector is typically found directly below the driver side dash console.
- Plug the OBDII connector into the vehicle port.

- Route the HDMI connector up the driver side dash. (On most vehicles, the side panel may be removed to expose the underside of the dash for easier routing. Leave panel open until the display is installed.)
Windshield Mount Installation
- Use the alcohol wipe to clean the windshield in the area you plan to place the suction cup. Allow the glass to dry completely.
- Firmly press and hold the suction mount against the glass.
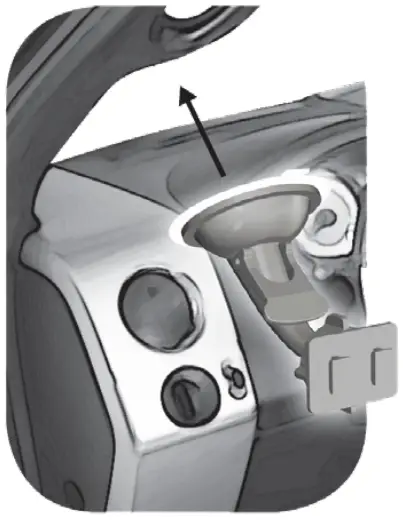
- Rotate the Cam Lever towards the glass to create the suction.
- Plug the HDMI connector into the back of the device and slide the device onto the mount.
Touch Screen
Use these gestures to navigate and control the display.  Select options, input values, enter menus, etc.
 Drag up or down menus, and scroll through menu items.
  Scroll through gauge screens or change option values.
  Enter sub-menus such as gauge editor.
Main Menu
The Main Menu displays each of the menu options available on your device. While navigating the menus, you will notice the Main Menu icon. ![]() Press this icon to take you directly back to the Main Menu.
Press this icon to take you directly back to the Main Menu.
To navigate to one of the 6 menu options, simply select an option icon. 
| Menu Options | Basic Descriptions |
| Tuning | Choose from standard or *custom* tuning options. |
| Performance Tests | Quickly and easily test your new tunes & performance. |
| Settings | Adjust device settings to better fit your needs. |
| Diagnostics | Monitor and record your vehicle performance. |
| Gauges & Logging | Diagnose and clear trouble codes |
| EAS Settings | Configure EAS Accessories. |
NOTICE: Tuning options not available on the CTS3 Insight
![]() WARNING
WARNING
Misapplication or misuse of this product could lead to a serious or fatal accident. Comply with all safety information in this manual, and your vehicle owner’s manual. Follow safety, installation and operating instructions in this User Manual to assure proper use.
Update Software
Downloading Update Agent 1.0
Update Agent 1.0 may be used to update the device via the USB connection. The software may be downloaded to the computer using either the internet, or a downloader installed on the device.
- Method 1 – Internet
A) Go to: www.edgeproducts.com
B) Click the UPDATES tab located at the top of the page.
C) Select the DOWNLOAD Update Agent 1.0 button, either Mac or PC (Windows).
Method 2 – Device
A) Connect the device to a computer using the supplied USB cable.
B) Browse the file explorer and locate the CTS3 drive.
C) Double-click the drive and open the folder labeled “Updater”.
D) Inside the Updater folder, double- click the Mac or Windows folder depending on the computer type.
E) Double-click the IgnitionInstaller. It is updater.sh for Mac users. - Click the RUN button on the pop-up menu.
- Read and click the box to accept the license agreement terms, then select INSTALL.
 NOTE: If you are asked to install the Universal Serial Bus, Click the Install button to continue.
 - Select the CLOSE button after the installation has successfully completed.
- Double-click the Update Agent 1.0 desktop icon.
- Fill out the registration form.
- Refer to the next page for performing product updates.
NOTE: Edge Products makes updates available periodically to add coverage and features. Updates could include a new version of the update software. When you elect to update, please refer to the “Download” tab and follow instructions for CTS3 updates in the event software should upgrade. Product Updates
This device has the ability to update via a USB connection or a wireless connection. Refer to the following information for USB updates. Refer to the Check for Updates feature under the Settings section for more information on wireless updates.
- Open the Update Agent 1.0 program, located on the desktop.
- Connect device to the computer using the supplied USB Cable. (Update Agent 1.0 will automatically search for updates related to the device.)
- Click the Update button.
(The update process will start and finish automatically. Once the update is complete, you may be directed to the Online Store. To further update your device using the online store, refer to the following steps.) - Click on any or all of the available options.
(A check mark will appear in the upper right corner.) - Click the Purchase button.
- If required, read and Accept the disclaimer.
- Fill in the required information and click Go to Review.
(Here you can check the info you entered before submitting.) - Click the Place Order button to complete you order.
- If a purchase was made, follow steps 1-3 above to complete the update.
NOTE: A warranty is available to protect the hardware and mechanical components of your CTS3 device in the Online Store.

Tuning
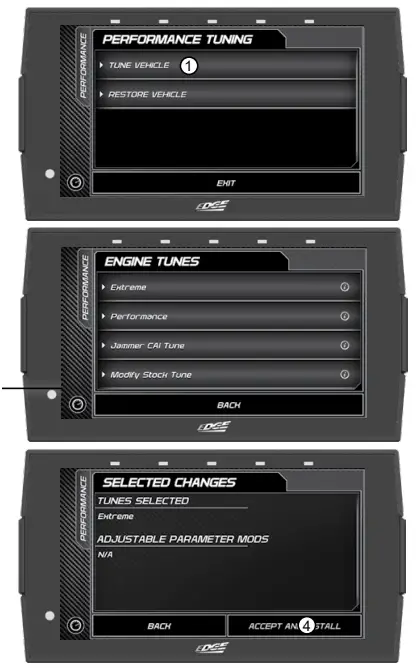
Tune Vehicle
While in the Main Menu, select the Tuning icon.
The tune vehicle option provides a list of tunes selected for your vehicle’s engine and transmission (transmission tunes available only on certain applications).
- Select the Tune Vehicle option. Scroll up/down to browse the available tunes.
- Select a tune to begin the programming sequence. Follow the on screen instructions.
NOTE: The device will proceed to read your vehicle’s stock files and save them for future use.
 TIP: For information on how the tune functions click the information icon next to the tune name.
 - Select Install to apply the tune as is or refer to step 6 to customize.
- Choose Accept and Install to continue. The programming sequence will begin.
NOTICE Do not remove or bump the OBD-II connector during any programming sequence. If you do, the vehicle may not start.
 WARNING
Do not program the vehicle while parked in unsafe locations including heavy traffic or places without cell phone service and the internet (if possible). - Once your vehicle has been successfully tuned, press Continue to return to the main menu.
Customization - Refer to steps 1 & 2 then select the Customization option.
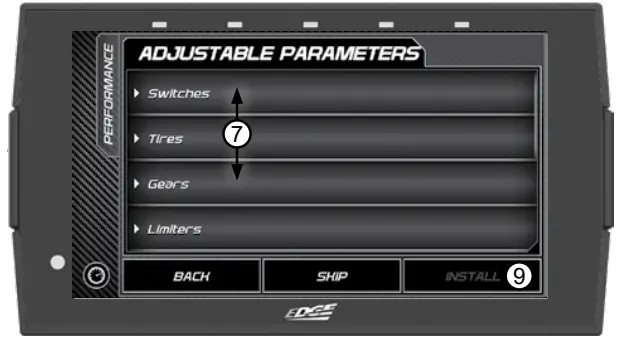
- Scroll up/down to view the available parameters. Select an option to modify.
- Modify the parameter using the tools provided in the menu option. Select Save to apply the changes.
Tool Examples: NOTE: Not all features are available on every make, model, and engine.
 - Once the parameters have been adjusted, choose Install to continue.
- Next, choose Accept and Install. The programming sequence will begin.
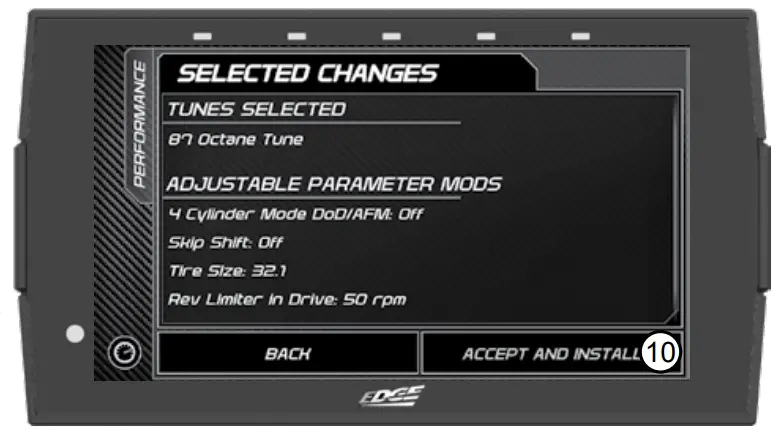
- Once your vehicle has been successfully tuned, press Continueto return to the main menu.
Restore Vehicle
Use this option to return the vehicle back to it’s stock tune.
- While in the Performance Tuning menu, select the Restore Vehicle option.
- Follow the on-screen instructions.

- Once your vehicle has been successfully restored, press Continue to go back to the main menu.
Performance Tests
0-60, 0-100, 1/4 Mile, & 1/8 Mile Tests
While in the Main Menu, select the Performance Tests icon.![]()
A list of tests will appear. Use the following information to learn more about each test.
- Select the Performance Test that you would like to start.
 NOTE: There are two ways to perform these tests. The use of a drag tree, or a stop light. Refer to the following for more information.
Drag Tree - When the vehicle is in place, select the Start button to initiate the drag tree sequence.
- Once the two green lights are lit up, release the brake and proceed to accelerate.
 From Stop
 - Switch methods by clicking the middle button.
- When the vehicle is in place, release the brake and proceed to accelerate.

NOTE: Once the speed has been reached, the test will stop and the results will be displayed. A digital drag slip will be created providing run information such as reaction time, speed at specific distances, and other useful information.
![]() WARNING Do not exceed legal speed limits on public roadways.
WARNING Do not exceed legal speed limits on public roadways.
![]() WARNING Running performance tests with this product should only be conducted in closed circuit, legally sanctioned racing environments expressly for this purpose. Violating traffic laws is dangerous and could result in injury or vehicle damage or both.
WARNING Running performance tests with this product should only be conducted in closed circuit, legally sanctioned racing environments expressly for this purpose. Violating traffic laws is dangerous and could result in injury or vehicle damage or both.
Settings
Display & Audio Settings
While in the Main Menu, select the Settings icon.![]()
A list of settings will appear. This section explains what these settings are and how to use them.
- Select the Display Settings option.
- Modify each setting by adjusting it’s corresponding setting value.
 Display Settings:
Day Mode Brightness
Adjust the display brightness for day-light driving.
Night Mode BrightnessAdjust the display brightness during nighttime or low-light driving.
Day/Night Threshold
Adjust the threshold of when day mode turns to night mode.
LED Brightness Adjust the brightness of the 5 device LEDs. - Select the Audio
Settings option. - Turn On/Off the global Alert and Touch sounds
Red = OFF
Green = ON
- Press Exit to return to the main settings menu.
Device Colors
Change and modify device colors for background and borders.
- Select the Device Colors option.
- Select between Background Tinting Color or Keyline Color Setting according to what is wanting to be changed.
- Select what color you would like your background or keyline to be.

- Press Save or Back to exit to return to the Device Colors menu. Selecting Back will offer the option to save any changes or not.
- Select Customize to make custom colors instead of using the standard offered with the palette.
- Adjust the numbers by either tapping the 0 to open the numberpad and type in a number or tap + or -.

- Select Save or Back to return to the menu.
Wi-Fi Setup
This device is equipped with the ability to connect to and update over a secure Wi-Fi connection. For more information on how to check for updates, refer to the Check for Updates section of this manual.
- Select the Wi-Fi Setup option. A list of available networks will appear.
NOTE: You may need to put in an Email address before connecting to a network. Put in the same email you registered the device with. - Select the network that you would like to connect the device to.

- Use the keypad to enter the network password, then press Enter. Note that most networks are case sensitive.

Check for Updates
If the device is connected to Wi-Fi, click this option to look online for updates. If updates are available, the device will provide the option to perform the update.
- Select the Check for Updates option.
Note: If Wi-Fi is disconnected, the device will prompt you to configure a network first. - If connected to Wi-Fi, the device will locate our server and check for any updates. If there are any, it will prompt you to download and install the updates.

- Follow the on screen instructions to complete the update process. If asked to reboot the device, press continue as prompted. The update should be completed after reboot.
Unit of Measure
Use this setting to globally modify the device to determine whether it uses Imperial or Metric units.
- Select the Unit of Measure option.

- Select (Imperial or Metric) then hit save.
NOTE: You will need to unplug the device for the changes to take affect. DO NOT unplug the device while driving.
Tire Size
- Double tap the C-Speed on the gauge screen as if to change it.

- Select Save and follow the onscreen prompt to the tire size menu.
Tire Size Cont’d
- Select the Tire Size that needs to be modified in the menu.
- Select the size accordingly and use the tabs above for other available options.

- Select Save to save any changes and return to the menu or Back to return to the menu with the option to not save any changes.
Restore Default PIDs
Use this setting to restore the default PID list.
NOTE: This will NOT restore your vehicles’ factory data.
- Select the Restore Default PIDs option.
- Press continue to restore the default PID list.

- Device will reboot automatically.
Restore Default Settings
Use this setting to restore the device back to the factory settings.
NOTE: This will NOT restore your vehicles’ factory data or unmarry the tool from your vehicle.
- Select the Restore Default Settings option.
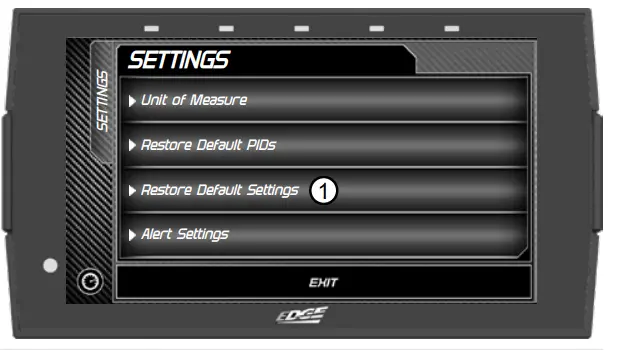
- Press continue to restore all user settings to the factory default values.
Alert Settings
Use this setting to globally turn on/off gauge alerts
- Select the Alert Settings option.
- Turn the setting ON or OFF using the toggle switch.

- Select Exit to return to the Settings menu.
Gauges & Logging
Gauge Layouts
While in the Main Menu, select the Gauges & Logging icon.![]()
The first of 3 gauge layouts will be displayed. To toggle between screen layouts, swipe the screen Left/Right. To edit the Gauge Layouts:
- Open the pull down menu by swiping downward starting from the top of the screen.
- Select Edit Layout.

- Once the Layout Editor is open, select one of the 3 layouts.

- Toggle through the screen style options by either swiping the image up/down, or selecting the up/down arrows.
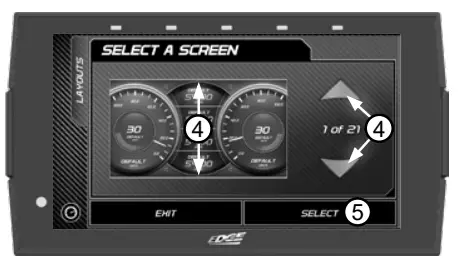
- Press the Select button to choose the new layout style. You will be brought back to the LayoutEditor screen.
- Press the Save button on the Layout Editor screen. You will be given the option to Save as new Layout. Use the keypad to enter a name for your custom layout then press Save.

Theme Settings
Change and modify individual gauge element colors & transparency.
- While the Gauge Screen is in view. Open the pull down menu by swiping downward starting from the top of the screen.
- Select Theme Settings.

- The following editor will come into view, showing your options.
- Select Save to apply the changes.

Backup Camera
To use a backup camera with the CTS3 device, a camera adapter is required.
This turns your RCA into a USB mini plug to connect to the CTS3. Visit https://edgeproducts.com for more information.
The camera has to be connected to the CTS3 before the device boots up to be recognized.
When the CTS3 can detect the gear parameter from the automatic transmission, the camera will automatically display when the vehicle is in reverse gear.
- While in the Gauge Screen, open the pull-down menu by swiping downward starting from the top of the screen.
- Select the camera icon.
- Touch the screen to return to gauges.

Wallpaper
Change the background image displayed on the device.
- While the Gauge Screen is in view. Open the pull down menu by swiping downward starting from the top of the screen.
- Select Wallpaper.

- Toggle through the available background images by either swiping up/ down on the image, or using the up/down arrows.
- Press the Select button to apply the background image.

Custom Wallpaper
Add custom wallpapers to be displayed as the device background.
- Plug in the device and find the cts3 folder on your PC and open it like you would a flashdrive.
- The cts3 device folder should show a Backgrounds folder.
- Drag or save any images wanted as a background into that folder.
- Return the device to your vehicle and follow the steps to changing your wallpaper. Any images added will automaticallyappear in your wallpaper list.

NOTE: The suggested image size is 1280 x 720. Anything smaller will be automatically centered by the CTS3. The image should be a .jpg, .png, or .gif. The device will also begin to slow down the more images there are. Recommended amount is five.
Individual Gauge Setup
Each gauge within a gauge layout can be modified individually. Settings such as Unit of Measure, PIDs, Alert Settings, & Tick Marks may be modified.
PID Selection:
- While the gauge screen is in view, Double Tap the individual gauge to be modified.
- Select a PID from the provided list. Swipe up/down to see the entire list.

- A green check mark will appear next to the selected PID.
- If the PID measures temperature, speed, or pressure use the provided toggle switch to change between Metric or Imperial units.
- Select Save to apply the changes.

Alert Settings:
- Select the
 icon.
icon. - Use the (3) toggle buttons to toggle each option on/off.
 Alerts On/Off
 Alert sounds On/Off
 Warning On/Off
- To adjust the warning and alert values for the PID, use the value editors. Tap on the center value to open a keypad to set specific values.
- Select Save to apply the changes.
Tick Mark Customization:
- Select the
 icon.
icon. - With the min/max values, you can adjust where the gauge starts and ends.
- Adjust the number of Minor Tick Marks visible on the gauge.

- Adjust the number of Major Tick Marks visible on the gauge.
- Select Save to apply the changes.
Pitch / Roll G-Force Screen
Each CTS3 device gives you the option to check the pitch and roll of your vehicle.
- While the Gauge Screen is in view. Open the pull down menu by swiping downward starting from the top of the screen.
- Press the Layout Editor and choose which screen you wish to replace.

- Once selected, using the up and down arrows to the right, select the Pitch / Roll G-Force Screen.

- Select Save and choose to create or replace a layout.
- Select Back and when the Gauge Screen is in view, swipe right until you’re on the Pitch / Roll G-Force Screen. Swiping right or left will depend on what screen you chose to change in step 2.

NOTE: By holding down on the pitch / roll gauge for three seconds, you can level the gauges and G-Meter out to 0.
Recording
Use the recording option to log and save vehicle data.
- While the Gauge Screen is in view. Open the pull down menu by swiping downward starting from the top of the screen.
- Press the Record button to start the recording process. When the desired amount of information has been gathered, press the Stop button.

DataViewer Download
This windows software allows OBDII data logs that were recorded with the Edge Products tuner to be opened and viewed. This software can be downloaded from the Edge Products website.
- Go to: www.edgeproducts.com
- Click the UPDATES tab located at the top of the page.
- Select the DOWNLOAD button under DataViewer software.
- Click the RUN button on the pop-up menu.
- Follow the on-screen instructions.
DataViewer
After a recording session, unplug the device from the vehicle and follow these instructions.

EAS Accessories
EAS Overview
The CTS3’s functionality may be added upon by use of EAS (Expandable Accessary System) devices. The CTS3 automatically connects to any new EAS devices connected to it before it boots on, and will alert the user.
Upon installation and loading of a new device, the following settings are available:
- DISPLAY NAME: Changing this item will change the name of the PID, this name will be shown on the gauges and in the PID selection menu.
- DESCRIPTION: Changing this item will change the description of the PID. This is shown when pressing the INFO button when assigning to PID to a gauge.
- DISPLAY UNITS: Changing this item will change the Units when displayed on gauges.
- SCALING: Selecting one of these scaling options will allow the device to display the proper data once placed on a gauge. This selection is required for your EAS accessory to work properly.
- CURRENT SETTINGS: This will display the current settings previously saved within the device.
- RESTORE DEFAULTS: This will restore all items preloaded with this device in relation within this EAS device.
TIP: These settings can be changed at a later time through the EAS Settings Menu. EAS Device Instructions
EAS EGT Probe
The EAS EGT Probe does not need any of the pre-defined settings adjusted. However, users have the ability to customize it’s Name, Description, and/or Display Units.
EAS Universal Sensor Input (5 Volt)
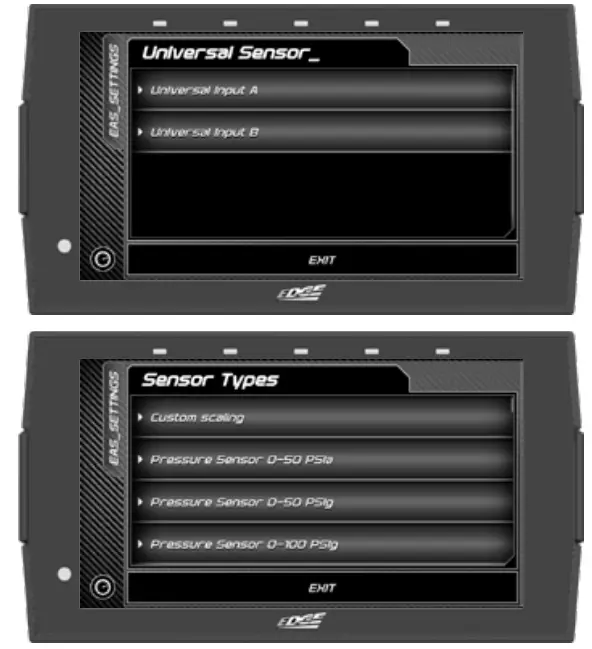
The EAS Universal Sensor Input provides the ability to read any 0-5 volt signals and translate them into meaningful values for display on the CTS3. Use the EAS Settings Menu to properly configure any sensor intended for use with the accessory. There are two channels to this input, Channel A and Channel B. Following the onscreen prompts will allow you to go to each channel’s individual settings.
Setting up a EAS branded sensor:
- Enter the EAS Settings Menu.
- Select your Universal Sensor Module (Note: the serial number should match the unit that is connected to the sensor you are attempting to configure).
- Select the channel that you connected your sensor to, either A or B.

- Select Scaling and then search the list for the sensor you are using.
- At this point, you can save the settings and begin using the sensor. The name and description will be populated with the default EAS sensor’s name, description, anddisplay units.
- Alternatively, you can customize the name, description, and units if you choose. (Note: Changing the sensors display units does not have any effect on the data being displayed. The sensors scaling is set up for the default display units).
- When in the Gauges mode, you’ll be able to apply that sensor to any gauge using the Gauge Editor Menu.
Setting up a custom sensor (non-EAS):
- Enter the EAS Settings Menu.
- Select your Universal Sensor Module (NOTE: The serial number should match the unit that is connected to the sensor you would like to configure).
- Select the channel that you connected your sensor to, either A or B.
- Select Name to give your sensor a name (optional).
- Select Description to give your sensor a description (optional).
- Select Display Units to define your sensor’s display units.
- Select Scaling and then Custom Scaling.
- From this screen you’ll be able to add as many data points necessary to scale your sensor. This information should be provided by the sensor manufacturer. If it’s a resistive based sensor, you can toggle from Voltage to Resistance. Doing this will allow you to also select the pull up resistor value, 1K or 10K.
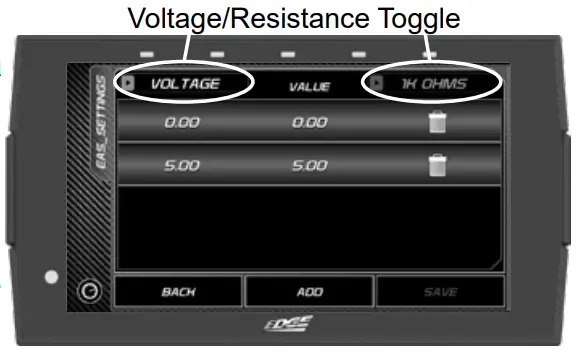
- Once you’ve added all of the data points to the scaling you can then save all of your sensor’s settings.
- When in the Gauges mode, you’ll be able to apply that sensor to any gauge using the Gauge Editor Menu.
EAS Power Switch
The EAS Power Switch allows you to control your favorite aftermarket accessories such as lights, air compressors, etc. directly through the CTS3 Upon starting the CTS3 for the first time with the EAS device installed, you may go straight to changing Switch settings, or you may opt to go to the home menu and navigate to the EAS Settings Menu at any time after to change the Switch Names and Descriptions.
When an EAS Power Switch is connected to a CTS3, a new switch page is automatically added to the Gauged mode. It is added in the very first slot, to the far left of the gauge pages.
The switch page will be automatically populated with connected switches (up to 4). You also have the option of placing a switch on any digital gauge. Switch Operation:
- A single tap on a switch, or digital gauge holding a switch, will change the state of the switch.
- A long press and hold on a switch, or digital gauge holding a switch, will enter the Switch Customization Menu.
Switch Customization Menu:
Users can change the switch look, and LED color through this menu.
Gauges Mode Operation with EAS Power Switch connected:
- If an EAS Switch module is present, the sleep timer is extended to 30 seconds. The 30 second timer is also used if a device is woken up by a tap (warm boot).
- If a switch is toggled to the ON position, the sleep timer is suspended until the switch is toggled to the OFF position. Once the switch is toggled OFF, the sleep timer will begin counting down.

Diagnostics
Trouble Codes
While in the Main Menu, select the Diagnostics icon.![]()
The trouble codes screen will appear. If any codes have been initiated, they will show in the list as a P####.
NOTE: Trouble codes are created when an issue is detected by vehicle sensors. Use this feature to view and clear these trouble codes. 
- If a code has been initiated, select the code to see a description of the issue.
TIP: Write the codes down for future reference. - Once you have read the code(s) description, you have the option to clear them. Select Clear All to clear the codes from the device and reset the vehicle’s check engine light.
NOTE: If a DTC persists, this could indicate a vehicle malfunction, We recommend seeking a qualified professional in resolving the issue. Program the vehicle back to stock prior to service.
Manual Regeneration
If you vehicle supports Manual Regeneration, there will be a menu option in the Diagnostics Menu of the device.
NOTE: Certain operating conditions are required for Manual Regen to operate. There could be, but not limited to; Engine Coolant Temp, Engine Oil Temp, Vehicle Speed, etc.
- Open the Diaganostics Menu by swiping up from the Gauge Screen and selecting Diagnostics.
NOTE: The Diagnostic menu is also available in the Main Menu.

- Select Manual Regen.
- Follow the on-screen prompts to enable Manual Regen.
Mobile Regeneration
- Open the Diaganostics Menu by swiping up from the Gauge Screen and selecting Diagnostics.
- Select Manual Regen.

- Follow the on-screen prompts to enable Manual Regen.
Injector Balance Rates
Injector Balance Rates (Duramax Only)
- To view Injector Balance Rates on your GM Duramax, enter the Diagnostics Menu.
- Find Injector Balance Rates and select this option to see your Injector Balance Rates.

Help/Info
Device Info
While in the Main Menu, select the Settings icon, ![]() and open the Help/Info Option.
and open the Help/Info Option.
The device info described below assists our Tech Support team when support is needed. 1 Click the Device Info option. The following information will appear:
Application Info – Gives version information for the various applications running on the device.
Database Info – Gives version information for the various databases stored on the device such as Tunes, PIDs, and DTC codes.
Tool Info – Gives information about the device such as the serial number, born date, licenses, tool type, etc.
Vehicle Info – Information about the vehicle such as the vehicle identification number (VIN) and Engine Control Module (ECM).
Tuned Vehicle Info – Information about the vehicle that this device has tuned such as the VIN and ECM.
Debian – Information about the Linux Debian build the device is using.
Open SSL – Information about the Open SSL
Boost – Information about Boost software.
FCC – Information about FCC compliance.
Tutorials
All of the available tutorials are stored here and can be accessed at any time.
- Select the Tutorials option.
- View each tutorial by swiping left/right.

- Select Continue to return to the Help/Info menu.
F.A.Q’s
Displays and answers a few frequently asked questions about the device and it’s features.
- Select the F.A.Qs option. A list of questions and answers will appear.

Runtime Log
How to generate and access a Runtime log on the CTS3 device.
- During the time of an issue or shortly after having an issue, with a paperclip or something similar, locate the small hole in the back bottom left corner of the device.
- Press and release the button. This has to be done during or shortly after you have an issue but BEFORE the device powers off or is disconnected.
- Wait 3-5 seconds then disconnect the CTS3 from the vehicle and connect it via USB to a computer.
- On the computer, go to your drive in “This PC”. The CTS3 will come up in your Devices and Drives like a flash drive. It should be labeled cts3 (D:)
- Expand the cts3 drive and in that drive locate the Runtime folder and open it.
- The most recent Runtime will be labeled “runtime_00.dbg” at the top of that list. Pleae save the most recent runtime (the top most runtime) and attach it to an email.
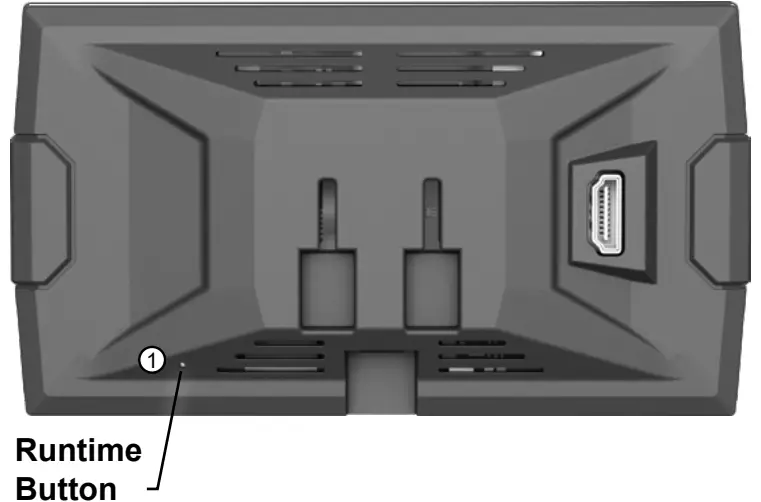
NOTE: Nothing will flash or change when the button is pressed. As long as you can feel the button being depressed and release, then move on.
Tech Support
This option is to be used only when Tech Support requests information.
NOTE: When a menu item is selected, a set of “keys” will be given. Tech Support will use these keys to produce a code that you will use to access the menu items functionality.
- Select the Tech Support option. A list of questions and answers will appear.
TIP: Select Exit to return to the main menu.
- Select the menu item as required by Tech Support.
Force Calibration Update – This option programs the vehicle with the stock calibration file. It is useful for recovering problematic ECUs.
Force Restore – This option will program the vehicle with a preciously saved stock file. It is also useful for recovering problematic ECUs.
Vehicle Reset – Erases all vehicle specific information from the device.
Clear Updates – Erases any flagged calibration updates for the ECU.
Registry Reset – Erase all cached vehicle information from the device.
Generate Log – Write any cached debug information to a debug file that can be retrieved from the public folder.
![]() www.edgeproducts.com
www.edgeproducts.com
For more information contact our Technical Support team:
(801) 476-3343 6:00 am – 5:00 pm MST
or
tech@edgeproducts.com
To expedite your support, please have your Vehicle Information,
Part Number, and Serial Number ready prior to contacting us.
Copyright© 2020
D10023810 Rev00 10/12/2020
Documents / Resources
 |
Edge Products 85452-252 Evolution CTS3 Programmer Programmers Summit Racing [pdf] User Guide 85452-252, 85452-252 Evolution CTS3 Programmer Programmers Summit Racing, 85452-252, Evolution CTS3 Programmer Programmers Summit Racing, CTS3 Programmer Programmers Summit Racing, Programmer Programmers Summit Racing, Programmers Summit Racing, Summit Racing, Racing |